
Procedural Writing or How-To Writing is always a favorite writing type. Students love to feel like experts and procedural writing gives them the chance to show off their expertise! In this blog post, we’ll explore the benefits of using writing graphic organizers in the classroom and show you how to leverage them to improve your students’ how-to writing abilities. This post does contain Amazon Affiliate links. If you purchase anything through these links I will receive a small commission at no cost to you!

Why Use Graphic Organizers to Teach Writing?
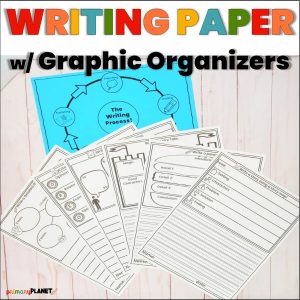
Prewriting is an important part of the writing process! Using a graphic organizer for prewriting is an awesome way to provide structure and organization for students. By breaking down their ideas into smaller pieces, young writers can more easily see the connections between different parts of their writing and make sure that they have all the parts that they need. This can be especially useful for students who struggle with expressing themselves through writing.
If you have never used a graphic organizer to teach a writing lesson, you will want to model how to use it. I liked to use the gradual release of responsibility model of instruction in my classroom. Basically, it boils down to “I do… We do… You do…” so in this post, I will be giving you some lesson ideas in each of those parts to help you successfully teach Procedural Writing!
1. Procedural Writing Lesson Set-Up
I loved to start with a (Amazon Affiliate link) mentor text. Students LOVE a story! A great story to start with when you are teaching procedural writing is How to Train a Train by Jason Carter Eaton and Jon Rocco. The book explains how you catch a train, and how you train a train to be a pet.

When you are finished reading, talk about the steps to take to train a train and explain that they will be writing their own procedural (how-to) piece. Show the graphic organizer and talk about how it can be helpful when you are writing. Model using the graphic organizer to fill in the steps from the book.
Then, have students turn and talk to a partner about what they are experts at doing, and have the students choose what they are going to write about for their procedural writing piece.
Next, hand out the graphic organizer (G.O.) and have your students write or draw what they are planning to write about in the topic box. Either collect the papers or have your students keep theirs somewhere safe like their writing folder/binder.
2. “I Do” How-To Writing
So, the I Do part is YOU, the teacher. You model what you want the students to eventually do on their own. I love to start out with the why? Why do we write “How-To” texts? Where do we see how-to writing ALL the time (directions on worksheets). When you want to learn how to do something new, you can read about how to do it. Show the students the graphic organizer and talk together about the parts. What needs to go into procedural writing, talk about the transition words, and why those are needed.
Then, using your own graphic organizer, model for your students your thinking and writing about a topic you choose. I went to a conference once and the presenter told us to write about something that the students really couldn’t write about because they don’t do it, like driving so they don’t copy your writing. I ALWAYS wrote about doing laundry. It really became a running joke in my classroom, but I always figured out how to make my writing about laundry. While you are filling it out, tell your students what you are thinking about.
Ask students to turn and talk to their partners about what they saw you do and write. What steps did you take? What kinds of things did you keep? What didn’t you write?
Call the students back, and do your procedural writing on the lines, showing the students how you use what you wrote on the graphic organizer to write your how-to piece. Read through it together when you are done to make sure that it makes sense.

Keep your writing for the lesson tomorrow.
3. “We Do” Procedural Writing
“We Do” means that you write together! Start with the graphic organizer you wrote yesterday. Read it back through with your students and talk about what you wrote and the different parts that you need. Then, explain you will be writing about how to do something together as a class. You can ask for suggestions from students, or you can choose something to write about together. I suggest that you write about a classroom procedure because that is a shared experience and a great way to reinforce that procedure such as how to get a sharp pencil, or how to get in line at the door.
Using the graphic organizer and student input fill out the graphic organizer together. Then, on the draft writing lines, write the procedure out using the graphic organizer together. Read it aloud and have a student or the whole class follow the procedure as you read it!
4. “You Do” Procedural Writing
Today is the day that the students will start working on their own procedural writing. Review the writing that you did yesterday together. Highlight the transitional words on the G.O. and in the draft writing that you did to make sure that they remember that those words need to go into their draft writing to help their writing flow and make sense. Make sure that the students all have their G.O. and have them pair up with a partner. Show your students how to touch each section on the graphic organizer and say what they will write in that space. They will share with their partner their plans for their procedural writing. Then, have students go back to their seats or to their writing spot and fill out their Graphic Organizer.
You can stretch this lesson to another day if you want, and have them write their draft on the next day, or you can have them write their draft when they are finished filling out the Graphic Organizer. Collect these or have the students store them in their writing folders.

5. Final Draft
Have students get or pass out the graphic organizers to the students. Give them a moment or two to read through their drafts with a partner. Then, have students pair up, and go through each other’s drafts to look for mistakes using CUPS: Correct Capitals, Understanding (Does it make sense?, Do they have the transition words), Punctuation, and Spelling.
Then, give students a fresh piece of paper or a blank mini-book for them to write their final copy, fixing any mistakes and adding illustrations (if you would like). These I would collect when they are finished, or these make a great display. If you are creating a writing portfolio for your students or if parent conferences are coming up, this would be a great piece for either of those.
Thanks for reading! You can find a pdf version of this procedural writing lesson plan for free HERE!
Other Writing Mini-Lessons for You!
If you are looking for other writing mini-lessons you can find those here:
- HOW TO SUCCESSFULLY TEACH SEQUENCING WITH FUN WRITING MINI-LESSONS
- PLAYFUL MINI-LESSONS: MAKE A LIST WRITING PROMPTS FOR STUDENTS
- HELPFUL MINI-LESSONS FOR TEACHING SENTENCE TYPES YOU NEED
My most popular writing mini-lesson post:
Thanks so much for taking the time to check out my post! Save this great information for later! Pin the image below.

Happy Teaching,